Monday, May 3, 2010

ASA trunk interface configuration

trunkconfiguration
Switch side
Switch(config)#int fa0/9
Swtich(config-if)#switchport
Swtich(config-if)#switchport trunk encapsulation dot1q
Swtich(config-if)#switch trunk allowed vlan 100,101 (if not specified, every vlan  will send to ASA)
Swtich(config-if)#swtichport mode trunk (ASA cannot negotiate trunk using dynamic protocol)
Swtich(config-if)#no shut

ASA side
NOTE: Each physical interface of ASA carry one or more sub interfaces, each carries one vlan

ASA(config)# int e0/3
ASA(config-if)# no shut
ASA(config)# int e0/3.1
ASA(config-subif)# vlan 100 ; specifies which vlan carried over this sub interface
ASA(config-subif)# nameif inside
ASA(config-subif)# ip address 10.1.1.1 255.255.255.0
ASA(config)# int e0/3.2
ASA(config-subif)# vlan 101
ASA(config-subif)# nameif building1
ASA(config-subif)# security-level 50
ASA(config-subif)# ip address 10.2.1.1 255.255.255.0
ASA(config-subif)# no shut

Trunk interface on firewall module
cat6500#show vlan : to see vlan inside switch
cat6500#show module : to see connected module number
cat6500#config t
cat6500(config)#firewall vlan-group 1 10,100 ;says which vlan should send to firewall module, vlan group number can be anything.
cat6500(config)#firewall module 3 vlan-group 1 ; to which firewall module to send these to

Cat6500#session slot 3 processor 1
FWSM> enable
FWSM# config term
FWSM(config)#interface vlan 10
FWSM(config-if)#nameif outside
FWSM(config-if)# ip address 192.168.10.1 255.255.255.0
FWSM(config-if)#no shut
FWSM(config-if)#exit

FWSM(config)# int valn 100
FWSM(config-if)#namif inside
FWSM(config-if)#ip address 172.30.10.1 255.255.255.0
FWSM(config-if)#no shut
FWSM#show int

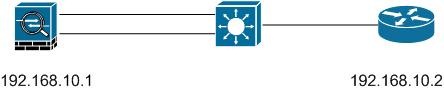
ASA Redundant Interface


REDUNDANT INTERFACE ASA
ciscoasa(config)# int redundant 1
ciscoasa(config-if)# member-interface ethernet 0/0
ciscoasa(config-if)# member-interface ethernet 0/1
ciscoasa(config-if)# nameif outside
ciscoasa(config-if)# ip address 10.10.10.1 255.255.255.0
ciscoasa# show interface redundant 1 : to check both are operational
at the bottom we can see redundancy information
show interface :- we can see which one is active
show interface | include (Interface|member)
NOTE: if primary interface came up it will not switch back until the current one fails

Tuesday, March 23, 2010

Creating Site-to-Site VPNs with Pre-Shared Keys

Documentation:
1. Document your IKE Phase 1 negotiation criteria (example below)
  • Encryption algorithm: AES-128
  • Hashing: SHA-1
  • Authentication: pre-shared
  • Key exchange: Diffie-Hellman Group 2
2. Document your IPSec (IKE Phase 2) negotiation criteria (example below)
  • Encryption algorithm: esp-aes 128
  • Authentication: esp-sha-hmac
Configuring IKE Phase 1:
1. Enable ISAKMP: Router(config)#crypto isakmp enable
2. Create ISAKMP Policy: Router(config)#crypto isakmp policy <1-10000>
  • Router(config)#crypto isakmp policy 100
  • Router(config-isakmp)#encryption aes 128
  • Router(config-isakmp)#authentication pre-share
  • Router(config-isakmp)#group 2
  • Router(config-isakmp)#hash sha
3. Configure ISAKMP Identity: Router(config)#crypto isakmp identity <address/hostname>
4. Configure pre-shared keys: Router(config)#crypto isakmp key <key> address <remote_ip>
Configuring IKE Phase 2:
1. Create transform sets: Router(config)#crypto ipsec transform-set <name> <methods>
  • Router(config)#crypto ipsec transform-set JEREMY esp-aes 128 esp-sha-hmac
2. (optional) Configure IPSec lifetime: : Router(config)#crypto ipsec <seconds/kilobytes> <value>
3. Create mirrored ACLs defining traffic to be encrypted and the traffic expected to be received encrypted
4. Set up IPSec crypto-map: Router(config)#crypto isakmp map <name> <seq> ipsec-isakmp
  • Router(config)#crypto map MAP 100 ipsec-isakmp
  • Router(config-crypto-map)#match address <acl>
  • Router(config-crypto-map)#set peer <remote_ip>
  • Router(config-crypto-map)#set pfs <group1/2/5>
  • Router(config-crypto-map)#set transform-set <set>
Verify:
  • show crypto isakmp policy
  • show crypto ipsec transform-set
  • show crypto ipsec sa
  • show crypto map
  • debug crypto isakmp
  • debug crypto ipsec

Java configuration for IPS (IDM)


Step 1 Close all instances of Internet Explorer or Netscape.

Step 2 Click Start > Settings > Control Panel.

Step 3 If you have Java Plug-in 1.4.2 installed:

a. Click Java Plug-in.

The Java Plug-in Control Panel appears.

b. Click the Advanced tab.

c. Type -Xmx256m in the Java RunTime Parameters field.

d. Click Apply and exit the Java Control Panel.

Step 4 If you have Java Plug-in 1.5 installed:

a. Click Java.

The Java Control Panel appears.

b. Click the Java tab.

c. Click View under Java Applet Runtime Settings.

The Java Runtime Settings Panel appears.

d. Type -Xmx256m in the Java Runtime Parameters field and then click OK.

e. Click OK and exit the Java Control Panel.

Commonly Used Regular expressions

image
Technorati Tags: